
Explore three different textures and stitches
with this short-sleeve cardigan, worked top down in one piece.
Gradually add stitches to the front of the garment to shape the deep
neckline. Slim buttonbands are worked at the upper bodice to allow for closure.
Getting Started

FINISHED SIZE
32 1/4 (34 1/2, 36 1/2, 40 1/4, 44)" bust circumference. Garment shown measures 32 1/4" with 1 1/4" ease, buttoned.
YARN Blue Sky Alpacas Alpaca Silk (50% alpaca, 50% silk; 146 yd [133 m]/1 3/4 oz [50 g]; #103 plume, 5 (5, 6, 7, 7) balls.
HOOK Size F/5 (3.75 mm). Adjust hook size if necessary to obtain correct gauge.
NOTIONS St markers (m); safety pin as stitch holder; four 3/4" shanked buttons; yarn needle.
GAUGE 8 sts and 18 rows = 4" in V-st patt; 4.25 Mini Ripples and 9.5 rows = 4"; 4 CRdtr and 2 rows = 3 1/2" wide and 1 1/4 tall.
Notes
Cardigan is worked from the top down in one piece with raglan shaping. Yoke begins with shoulders and back only and then the fronts are added by increasing at the front edges. Move markers up every row.
Stitch Guide
V-Stitch (V-st): (Sc, ch 2, sc) in indicated st or sp.
Double crochet V-Stitch (dcV-st): (Dc, ch 1, dc) in indicated st or sp.
Treble crochet V-Stitch (trV-st): (Tr, ch 1, tr) in indicated st or sp.
Mini Ripple: Worked over 4 sts; dc3tog over next (dc, dc3tog, dc), 3 dc in next dc.
Crossed double treble crochet (CRdtr): Worked over 4 sts; sk next 2 sts, dtr in next 2 sts, working in front of last 2 dtr, work dtr in first skipped st, then work dtr in next skipped st.
Three-stitch CRdtr (3-st CRdtr): Worked over 3 sts; sk next st, dtr in next 2 sts, working in front of last 2 dtr, dtr in skipped st.
Pattern
YOKE
Ch 85 (85, 85, 103, 103).
Row 1: (RS) Sc in 2nd ch from hook, sk next ch, ch 2, sc in next ch, *sk next ch, sc in next ch, ch 2, sc in next ch; rep from * across, turn—28 (28, 28, 34, 34) ch-2 sps. Place marker (pm) in 8 (8, 8, 10, 10)th ch-2 sp and 21st (21st 21st, 25th, 25th) ch-2 sp for back shoulder raglans.
Row 2: Ch 1, V-st in first sc, *V-st in each ch-2 sp to m, V-st in sc before marked ch-2 sp, V-st in next ch-2 (mark this V-st), V-st in sc after marked ch-2 sp; rep from *, V-st in each ch-2 sp to end, V-st in last sc, turn—34 (34, 34, 40, 40) V-sts.
Place 2 additional m in 2nd and 2nd to last V-st of row for front raglans.
Row 3 (front inc): Ch 1, V-st in first sc, V-st in each V-st across, V-st in last sc, turn—36 (36, 36, 42, 42) V-sts: 1 V-st inc'd for each front.
Row 4 (raglan inc): Ch 1, *V-st in each V-st to m, V-st in first sc of marked V-st, V-st in next ch-2 sp, V-st in 2nd sc of marked V-st; rep from * 3 times, V-st in each V-st to end, turn—44 (44, 44, 50, 50) V-sts: 1 V-st inc'd for each front, 2 V-sts inc'd for each shoulder, 2 V-sts inc'd for back.
Rows 5-9: Rep Rows 3-4 two times, then work Row 3—66 (66, 66, 72, 72) V-sts: 8 V-sts each front, 13 (13,13,15,15) V-sts each shoulder, 20 (20, 20, 22, 22) V-sts for back, 4 marked raglan V-sts.
Sizes 32 1/4 (34 1/2, 36 1/2)" only:
Shape front neckline:
Row 10: (WS) Ch 1, V-st in each V-st across, ch 10 for front neckline, turn. Place working lp on safety pin. Join separate strand with si st in first sc at beg of Row 10, ch 9 for opposite front neckline. Fasten off separate strand.
Row 11: Cont with working lp, V-st in 2nd ch from hook, [sk 2 ch, V-st in next ch] 2 times, sk 2 ch, V-st in each V-st across, [sk 2 ch, V-st in next ch] 3 times, turn—72 V-sts: 11 V-sts each front, 13 V-sts each shoulder, 20 V-sts for back, 4 marked raglan V-sts.
Row 12 (raglan inc): Rep Row 4—80 V-sts: 12 V-sts each front, 15 V-sts each shoulder, 22 V-sts for back, 4 marked raglan V-sts.
Sizes 40 1/4 (44)" only:
Row 10 (front and back inc): (WS) Ch 1, *V-st in each V-st to next m, V-st in first sc of marked V-st, V-st in marked ch-2 sp, V-st in each V-st to next m, V-st in marked ch-2 sp, V-st in 2nd sc of marked V-st; rep from *, V-st in each V-st to end, turn—76 V-sts: 9 V-sts each front, 15 V-sts each shoulder, 24 V-sts for back, 4 marked raglan V-sts.
Row 11 (front inc): Rep Row 3—1 V-st inc’d for each front.
Row 12 (back inc): Ch 1, V-st in each V-st to 2nd m, V-st in marked ch-2 sp, V-st in 2nd sc of marked V-st, V-st in each V-st to next m, V-st in first sc of marked V-st, V-st in marked ch-2 sp, V-st in each V-st to end, turn—80 V-sts: 10 V-sts each front, 15 V-sts each shoulder, 26 V-sts for back, 4 marked raglan V-sts.
Shape front neckline:
Row 13: (RS) Ch 1, V-st in each V-st across, ch 13 for front neckline, turn. Place working lp on safety pin. Join separate strand with si st in first sc at beg of Row 13, ch 12 for opposite front neckline. Fasten off separate strand.
Row 14: Cont with working lp, V-st in 2nd ch from hook, [sk 2 ch, V-st in next ch] 3 times, sk 2 ch, V-st in each V-st across, [sk 2 ch, V-st in next ch] 4 times, turn—88 V-sts: 14 V-sts each front, 15 V-sts each shoulder, 26 V-sts for back, 4 marked raglan V-sts.
All sizes:
Rows 13-15 (13-15, 13-15, 15-17, 15-17): Ch 1, V-st in each V-st across, turn.
Mini Ripple band:
Move m to each dcV-st as you come to them.
Set-up row: (WS) Ch 3 (counts as dc throughout), dc in first ch-2 sp, [dc3tog (see Glossary) over next (sc, ch-2 sp, sc), dc in next sc, dc in next ch-2 sp, dc in next sc] 5 (5, 5, 6, 6) times, *dc3tog over next (sc, ch-2 sp, sc), 2 dc in first sc of marked V-st, dcV-st (see Stitch Guide) in marked ch-2 sp, 2 dc in 2nd sc of last marked V-st, [dc3tog over next (sc, ch-2 sp, sc), dc in next sc, dc in next ch-2 sp, dc in next sc] 7 times, dc3tog over next (sc, ch-2 sp, sc), 2 dc in first sc of marked V-st, dcV-st in marked ch-2 sp**, 2 dc in next ch-2 sp, [dc3tog over next (sc, ch-2 sp, sc), dc in next sc, dc in next ch-2 sp, dc in next sc] 10 (10, 10,12,12) times, rep from * to **, 2 dc in 2nd sc of last marked V-st, [dc3tog over next (sc, ch-2 sp, sc), dc in next sc, dc in next ch-2 sp, dc in next sc] 5 (5, 5, 6, 6) times, dc3tog over next (sc, ch-2 sp, sc), dc in last ch-2 sp, dc in last sc, turn—6 (6, 6, 7, 7) dc3tog each front, 8 dc3tog each shoulder, 11 (11, 11, 13, 13) dc3tog for back, 4 marked raglan dcV-sts.
Row 1: (RS) Ch 3, dc in first dc, work 6 (6, 6, 7, 7) Mini Ripples (see Stitch Guide), *2 dc in first dc of dcV-st, dcV-st in dcV-st, 2 dc in 2nd dc of dcV-st, 3 dc in next dc, work 8 Mini Ripples, 2 dc in first dc of dcV-st, dcV-st in dcV-st, 2 dc in 2nd dc of dcV-st, 3 dc in next dc**, work 11 (11, 11, 13, 13) Mini Ripples; rep from * to **, work 5 (5, 5, 6, 6) Mini Ripples, dc3tog over next (dc, dc3tog, dc), 2 dc in top of tch, turn.
Row 2: Ch 3, dc in first dc, work 6 (6, 6, 7, 7) Mini Ripples, *dc3tog over next 3 dc, 2 dc in first dc of dcV-st, dcV-st in dcV-st, 2 dc in 2nd dc of dcV-st, dc3tog over next 3 dc, 3 dc in next dc, work 8 Mini Ripples, dc3tog over next 3 dc, 2 dc in first dc of dcV-st, dcV-st in dcV-st, 2 dc in 2nd dc of dcV-st, dc3tog over next 3 dc, 3 dc in next dc**, work 11 (11, 11, 13, 13) Mini Ripples; rep from * to **, work 5 (5, 5, 6, 6) Mini Ripples, dc3tog over next 3 sts, 2 dc in top of tch, turn—7 (7, 7, 8, 8) dc3tog each front, 10 dc3tog each shoulder, 13 (13,13,15, 15) dc3tog for back, 4 marked dcV-sts.
Row 3: Ch 3, dc in first dc, work 7 (7, 7, 8, 8) Mini Ripples, *2 dc in first dc of dcV-st, dcV-st in dcV-st, 2 dc in 2nd dc of dcV-st, 3 dc in next dc, work 10 Mini Ripples, 2 dc in first dc of dcV-st, dcV-st in dcV-st, 2 dc in 2nd dc of dcV-st, 3 dc in next dc**, work 13 (13, 13, 15, 15) Mini Ripples; rep from * to **, work 6 (6, 6, 7, 7) Mini Ripples, dc3tog over next (dc, dc3tog, dc), 2 dc in top of tch, turn.
Row 4: Ch 3, dc in first dc, work 7 (7, 7, 8, 8) Mini Ripples, *dc3tog over next 3 dc, 2 dc in first dc of dcV-st, dcV-st in dcV-st, 2 dc in 2nd dc of dcV-st, dc3tog over next 3 dc, 3 dc in next dc, work 10 Mini Ripples, dc3tog over next 3 dc, 2 dc in first dc of dcV-st, dcV-st in dcV-st, 2 dc in 2nd dc of dcV-st, dc3tog over next 3 dc, 3 dc in next dc**, work 13 (13, 13, 15, 15) Mini Ripples; rep from * to **, work 6 (6, 6, 7, 7) Mini Ripples, dc3tog over next (dc, dc3tog, dc), 2 dc in top of tch, turn—8 (8, 8, 9, 9) dc3tog or 33 (33, 33, 37, 37) sts each front, 12 dc3tog or 49 sts each shoulder, 15 (15, 15, 17, 17) dc3tog or 61 (61, 61, 69, 69) sts for back, 4 marked dcV-sts.
Crossed dtr band:
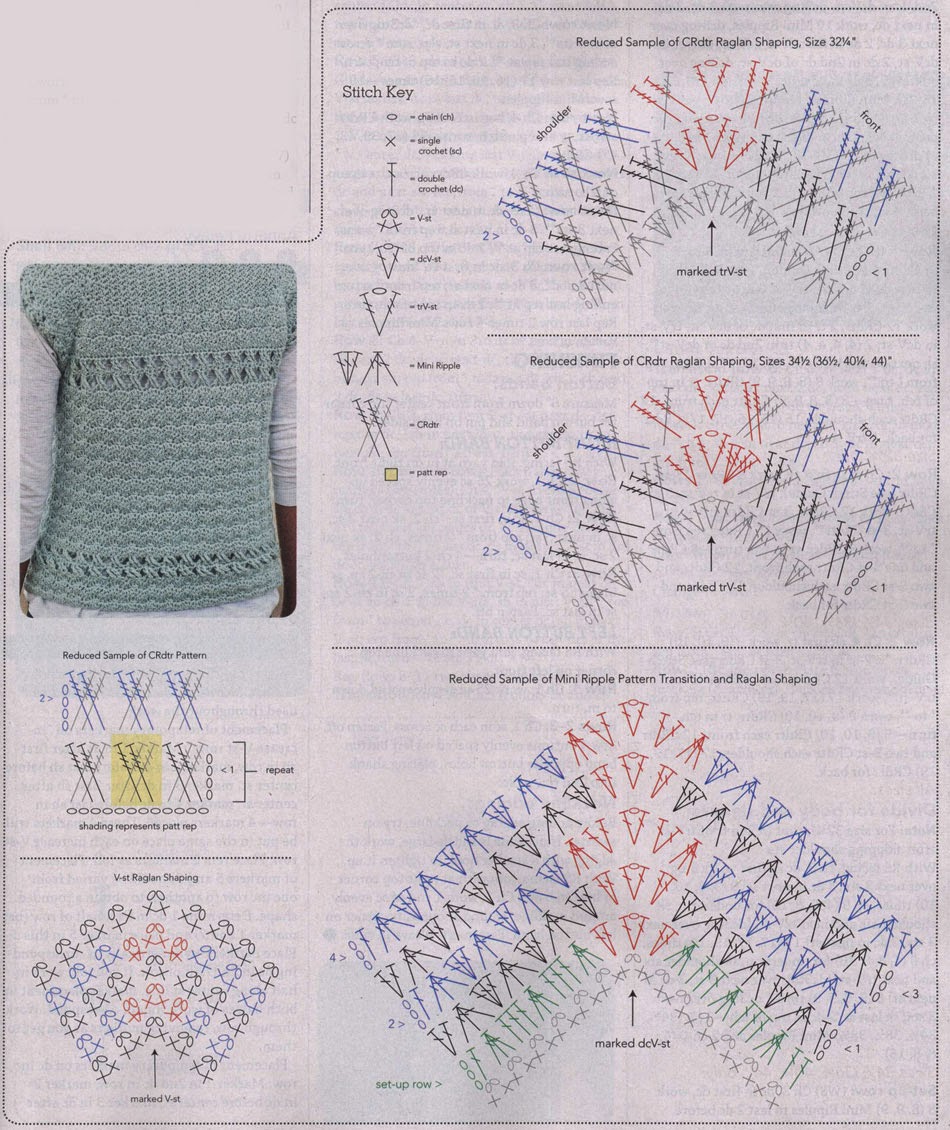
Row 1: (RS) Ch 4, sk first dc, work 8 (8, 8, 9, 9) CRdtr (see Stitch Guide), *2 (4, 4, 4, 4) tr in first dc of dcV-st, trV-st (see Stitch Guide) in dcV-st, 2 tr in 2nd dc of dcV-st, sk next dc, work 12 CRdtr, 2 tr in first dc of dcV-st, trV-st in dcV-st, 2 (4, 4, 4, 4) tr in 2nd dc of dcV-st**, sk next dc, work 15 (15, 15, 17, 17) CRdtr; rep from * to **, work 8 (8, 8, 9, 9) CRdtr, tr in top of tch, turn—8 (8, 8, 9, 9) CRdtr each front, 12 CRdtr each shoulder, 15 (15, 15, 17, 17) CRdtr for back, 4 trV sts.
Size 32 1/4 only:
Row 2: Ch 4, sk first tr, work 8 CRdtr, *3-st CRdtr (see Stitch Guide), trV-st in trV-st, 3-st CRdtr, work 12 CRdtr, 3-st CRdtr, trV-st in trV-st, 3-st CRdtr**, work 15 CRdtr; rep from * to **, work 8 CRdtr, tr in tch, turn—8 CRdtr and one 3-st CRdtr each front, 12 CRdtr and two 3-st CRdtr each shoulder, 15 CRdtr and two 3-st CRdtr for back.
Sizes 34 1/2 (36 1/2, 40 1/4, 44)" only:
Row 2: Ch 4, sk first tr, work 9 (9, 10, 10) CRdtr, *trV-st in trV-st, 3-st CRdtr (see Stitch Guide), work 12 CRdtr, 3-st CRdtr, trV-st in trV-st**, work 17 (17, 19, 19) CRdtr; rep from * to **, work 9 (9,10,10) CRdtr, tr in tch, turn—9 (9, 10, 10) CRdtr each front, 12 CRdtr and two 3-st CRdtr each shoulder, 17 (17, 19, 19) CRdtr for back.
All sizes:
Divide for body and sleeves:
Note: For size 32 1/4", cont in 2nd tr of trV-st after skipping shoulder sts. With RS facing, ch 3, dc in first tr, [dc3tog over next 3 sts, 3 dc in next st] 9 (9, 9, 10, 10) times, ch 0 (4, 8, 8, 16) for underarm, sk shoulder sts and next trV-st, [dc3tog over next 3 sts, 3 dc in next st] 17 (17, 17, 19, 19) times, ch 0 (4, 8, 8, 16) for underarm, sk shoulder sts and next trV-st, [dc3tog over next 3 st, 3 dc in next st] 8 (8, 8, 9, 9) times, dc3tog over next 3 sts, sk last st, 2 dc in top of tch—34 1/2 (34 1/2, 34 1/2, 38 1/2, 38 1/2) Mini Ripples and 2 ch-0 (4, 8, 8, 16).
Sizes 34 1/2 (36 1/2, 40 1/4, 44)" only:
Set-up row: (WS) Ch 3, dc in first dc, work 8 (8, 9, 9) Mini Ripples to last 2 dc before underarm ch, *dc3tog over next (2 dc and ch), 3 dc in next ch, [dc3tog over next 3 ch, 3 dc in next ch] 0 (1, 1, 3) times, dc3tog over next (2 ch and dc), 3 dc in next dc**, work 16, (16, 18, 18) Mini Ripples to last 2 dc before underarm ch; rep from * to **, work 9 (9,10,10) Mini Ripples to end—37 (39, 43, 47) Mini Ripples.
All sizes:
Next row: Ch 3, dc in first dc, *dc3tog over next 3 sts**, 3 dc in next st; rep from * across ending last rep at **, 2 dc in top of tch, turn. Rep last row 17 (16, 16, 16, 16) times—19 rows Mini Ripples.
Next row: Ch 4, beg in first st, work CRdtr across, tr in top of tch, turn—35 (37, 39, 43, 47) CRdtr.
Next row: Ch 4, work CRdtr across, tr in top of tch, turn.
Next row: Ch 3, dc in next tr, *dc3tog over next 3 sts**, 3 dc in next st; rep from * across ending last rep at **, 2 dc in top of tch, turn.
Next row: Ch 3, dc in first st, *dc3tog over next 3 sts**, 3 dc in next st; rep from * across ending last rep at **, 2 dc in top of tch, turn. Rep last row 2 times-4 rows Mini Ripples. Fasten off.
FINISHING
Button bands:
Measure 6" down from front center top comer for button band and pm on both sides.
RIGHT BUTTON BAND:
With RS facing, join yarn at m on right front.
Row 1: Ch 1, work 25 sc evenly spaced up along front edge to neckline top corner, turn.
Row 2: Ch 1, sc in first sc, *ch 2, sk next 2 sc, sc in next 5 sc; rep from * 2 times, ch 2, sk next 2 sc, sc in last sc, turn—4 ch-2 buttonholes.
Row 3: Ch 1, sc in first sc, *2 sc in ch-2 sp, sc in next 5 sc; rep from * 2 times, 2 sc in ch-2 sp, sc in last sc. Fasten off.
LEFT BUTTON BAND:
With RS facing, join yarn to neckline top corner on left front.
Row 1: Ch 1, work 25 sc evenly spaced down to m, turn.
Rows 2-3: Ch 1, sc in each sc across. Fasten off. Sew 4 buttons evenly spaced on left button band opposite button holes, placing shank into 2nd row of sc.
Neckline edging:
Before adding edging to neckline, try on sweater. If neckline is a little large, work the edging with a smaller hook to tighten it up. With RS facing, join yarn at right top corner of button band. Ch 1, work 1 rnd of sc evenly around neckline, ending at opposite corner on left button band. Fasten off. Weave in ends.


Getting Started
FINISHED SIZE
32 1/4 (34 1/2, 36 1/2, 40 1/4, 44)" bust circumference. Garment shown measures 32 1/4" with 1 1/4" ease, buttoned.
YARN Blue Sky Alpacas Alpaca Silk (50% alpaca, 50% silk; 146 yd [133 m]/1 3/4 oz [50 g]; #103 plume, 5 (5, 6, 7, 7) balls.
HOOK Size F/5 (3.75 mm). Adjust hook size if necessary to obtain correct gauge.
NOTIONS St markers (m); safety pin as stitch holder; four 3/4" shanked buttons; yarn needle.
GAUGE 8 sts and 18 rows = 4" in V-st patt; 4.25 Mini Ripples and 9.5 rows = 4"; 4 CRdtr and 2 rows = 3 1/2" wide and 1 1/4 tall.
Notes
Cardigan is worked from the top down in one piece with raglan shaping. Yoke begins with shoulders and back only and then the fronts are added by increasing at the front edges. Move markers up every row.
Stitch Guide
V-Stitch (V-st): (Sc, ch 2, sc) in indicated st or sp.
Double crochet V-Stitch (dcV-st): (Dc, ch 1, dc) in indicated st or sp.
Treble crochet V-Stitch (trV-st): (Tr, ch 1, tr) in indicated st or sp.
Mini Ripple: Worked over 4 sts; dc3tog over next (dc, dc3tog, dc), 3 dc in next dc.
Crossed double treble crochet (CRdtr): Worked over 4 sts; sk next 2 sts, dtr in next 2 sts, working in front of last 2 dtr, work dtr in first skipped st, then work dtr in next skipped st.
Three-stitch CRdtr (3-st CRdtr): Worked over 3 sts; sk next st, dtr in next 2 sts, working in front of last 2 dtr, dtr in skipped st.
Pattern
YOKE
Ch 85 (85, 85, 103, 103).
Row 1: (RS) Sc in 2nd ch from hook, sk next ch, ch 2, sc in next ch, *sk next ch, sc in next ch, ch 2, sc in next ch; rep from * across, turn—28 (28, 28, 34, 34) ch-2 sps. Place marker (pm) in 8 (8, 8, 10, 10)th ch-2 sp and 21st (21st 21st, 25th, 25th) ch-2 sp for back shoulder raglans.
Row 2: Ch 1, V-st in first sc, *V-st in each ch-2 sp to m, V-st in sc before marked ch-2 sp, V-st in next ch-2 (mark this V-st), V-st in sc after marked ch-2 sp; rep from *, V-st in each ch-2 sp to end, V-st in last sc, turn—34 (34, 34, 40, 40) V-sts.
Place 2 additional m in 2nd and 2nd to last V-st of row for front raglans.
Row 3 (front inc): Ch 1, V-st in first sc, V-st in each V-st across, V-st in last sc, turn—36 (36, 36, 42, 42) V-sts: 1 V-st inc'd for each front.
Row 4 (raglan inc): Ch 1, *V-st in each V-st to m, V-st in first sc of marked V-st, V-st in next ch-2 sp, V-st in 2nd sc of marked V-st; rep from * 3 times, V-st in each V-st to end, turn—44 (44, 44, 50, 50) V-sts: 1 V-st inc'd for each front, 2 V-sts inc'd for each shoulder, 2 V-sts inc'd for back.
Rows 5-9: Rep Rows 3-4 two times, then work Row 3—66 (66, 66, 72, 72) V-sts: 8 V-sts each front, 13 (13,13,15,15) V-sts each shoulder, 20 (20, 20, 22, 22) V-sts for back, 4 marked raglan V-sts.
Sizes 32 1/4 (34 1/2, 36 1/2)" only:
Shape front neckline:
Row 10: (WS) Ch 1, V-st in each V-st across, ch 10 for front neckline, turn. Place working lp on safety pin. Join separate strand with si st in first sc at beg of Row 10, ch 9 for opposite front neckline. Fasten off separate strand.
Row 11: Cont with working lp, V-st in 2nd ch from hook, [sk 2 ch, V-st in next ch] 2 times, sk 2 ch, V-st in each V-st across, [sk 2 ch, V-st in next ch] 3 times, turn—72 V-sts: 11 V-sts each front, 13 V-sts each shoulder, 20 V-sts for back, 4 marked raglan V-sts.
Row 12 (raglan inc): Rep Row 4—80 V-sts: 12 V-sts each front, 15 V-sts each shoulder, 22 V-sts for back, 4 marked raglan V-sts.
Sizes 40 1/4 (44)" only:
Row 10 (front and back inc): (WS) Ch 1, *V-st in each V-st to next m, V-st in first sc of marked V-st, V-st in marked ch-2 sp, V-st in each V-st to next m, V-st in marked ch-2 sp, V-st in 2nd sc of marked V-st; rep from *, V-st in each V-st to end, turn—76 V-sts: 9 V-sts each front, 15 V-sts each shoulder, 24 V-sts for back, 4 marked raglan V-sts.
Row 11 (front inc): Rep Row 3—1 V-st inc’d for each front.
Row 12 (back inc): Ch 1, V-st in each V-st to 2nd m, V-st in marked ch-2 sp, V-st in 2nd sc of marked V-st, V-st in each V-st to next m, V-st in first sc of marked V-st, V-st in marked ch-2 sp, V-st in each V-st to end, turn—80 V-sts: 10 V-sts each front, 15 V-sts each shoulder, 26 V-sts for back, 4 marked raglan V-sts.
Shape front neckline:
Row 13: (RS) Ch 1, V-st in each V-st across, ch 13 for front neckline, turn. Place working lp on safety pin. Join separate strand with si st in first sc at beg of Row 13, ch 12 for opposite front neckline. Fasten off separate strand.
Row 14: Cont with working lp, V-st in 2nd ch from hook, [sk 2 ch, V-st in next ch] 3 times, sk 2 ch, V-st in each V-st across, [sk 2 ch, V-st in next ch] 4 times, turn—88 V-sts: 14 V-sts each front, 15 V-sts each shoulder, 26 V-sts for back, 4 marked raglan V-sts.
All sizes:
Rows 13-15 (13-15, 13-15, 15-17, 15-17): Ch 1, V-st in each V-st across, turn.
Mini Ripple band:
Move m to each dcV-st as you come to them.
Set-up row: (WS) Ch 3 (counts as dc throughout), dc in first ch-2 sp, [dc3tog (see Glossary) over next (sc, ch-2 sp, sc), dc in next sc, dc in next ch-2 sp, dc in next sc] 5 (5, 5, 6, 6) times, *dc3tog over next (sc, ch-2 sp, sc), 2 dc in first sc of marked V-st, dcV-st (see Stitch Guide) in marked ch-2 sp, 2 dc in 2nd sc of last marked V-st, [dc3tog over next (sc, ch-2 sp, sc), dc in next sc, dc in next ch-2 sp, dc in next sc] 7 times, dc3tog over next (sc, ch-2 sp, sc), 2 dc in first sc of marked V-st, dcV-st in marked ch-2 sp**, 2 dc in next ch-2 sp, [dc3tog over next (sc, ch-2 sp, sc), dc in next sc, dc in next ch-2 sp, dc in next sc] 10 (10, 10,12,12) times, rep from * to **, 2 dc in 2nd sc of last marked V-st, [dc3tog over next (sc, ch-2 sp, sc), dc in next sc, dc in next ch-2 sp, dc in next sc] 5 (5, 5, 6, 6) times, dc3tog over next (sc, ch-2 sp, sc), dc in last ch-2 sp, dc in last sc, turn—6 (6, 6, 7, 7) dc3tog each front, 8 dc3tog each shoulder, 11 (11, 11, 13, 13) dc3tog for back, 4 marked raglan dcV-sts.
Row 1: (RS) Ch 3, dc in first dc, work 6 (6, 6, 7, 7) Mini Ripples (see Stitch Guide), *2 dc in first dc of dcV-st, dcV-st in dcV-st, 2 dc in 2nd dc of dcV-st, 3 dc in next dc, work 8 Mini Ripples, 2 dc in first dc of dcV-st, dcV-st in dcV-st, 2 dc in 2nd dc of dcV-st, 3 dc in next dc**, work 11 (11, 11, 13, 13) Mini Ripples; rep from * to **, work 5 (5, 5, 6, 6) Mini Ripples, dc3tog over next (dc, dc3tog, dc), 2 dc in top of tch, turn.
Row 2: Ch 3, dc in first dc, work 6 (6, 6, 7, 7) Mini Ripples, *dc3tog over next 3 dc, 2 dc in first dc of dcV-st, dcV-st in dcV-st, 2 dc in 2nd dc of dcV-st, dc3tog over next 3 dc, 3 dc in next dc, work 8 Mini Ripples, dc3tog over next 3 dc, 2 dc in first dc of dcV-st, dcV-st in dcV-st, 2 dc in 2nd dc of dcV-st, dc3tog over next 3 dc, 3 dc in next dc**, work 11 (11, 11, 13, 13) Mini Ripples; rep from * to **, work 5 (5, 5, 6, 6) Mini Ripples, dc3tog over next 3 sts, 2 dc in top of tch, turn—7 (7, 7, 8, 8) dc3tog each front, 10 dc3tog each shoulder, 13 (13,13,15, 15) dc3tog for back, 4 marked dcV-sts.
Row 3: Ch 3, dc in first dc, work 7 (7, 7, 8, 8) Mini Ripples, *2 dc in first dc of dcV-st, dcV-st in dcV-st, 2 dc in 2nd dc of dcV-st, 3 dc in next dc, work 10 Mini Ripples, 2 dc in first dc of dcV-st, dcV-st in dcV-st, 2 dc in 2nd dc of dcV-st, 3 dc in next dc**, work 13 (13, 13, 15, 15) Mini Ripples; rep from * to **, work 6 (6, 6, 7, 7) Mini Ripples, dc3tog over next (dc, dc3tog, dc), 2 dc in top of tch, turn.
Row 4: Ch 3, dc in first dc, work 7 (7, 7, 8, 8) Mini Ripples, *dc3tog over next 3 dc, 2 dc in first dc of dcV-st, dcV-st in dcV-st, 2 dc in 2nd dc of dcV-st, dc3tog over next 3 dc, 3 dc in next dc, work 10 Mini Ripples, dc3tog over next 3 dc, 2 dc in first dc of dcV-st, dcV-st in dcV-st, 2 dc in 2nd dc of dcV-st, dc3tog over next 3 dc, 3 dc in next dc**, work 13 (13, 13, 15, 15) Mini Ripples; rep from * to **, work 6 (6, 6, 7, 7) Mini Ripples, dc3tog over next (dc, dc3tog, dc), 2 dc in top of tch, turn—8 (8, 8, 9, 9) dc3tog or 33 (33, 33, 37, 37) sts each front, 12 dc3tog or 49 sts each shoulder, 15 (15, 15, 17, 17) dc3tog or 61 (61, 61, 69, 69) sts for back, 4 marked dcV-sts.
Crossed dtr band:
Row 1: (RS) Ch 4, sk first dc, work 8 (8, 8, 9, 9) CRdtr (see Stitch Guide), *2 (4, 4, 4, 4) tr in first dc of dcV-st, trV-st (see Stitch Guide) in dcV-st, 2 tr in 2nd dc of dcV-st, sk next dc, work 12 CRdtr, 2 tr in first dc of dcV-st, trV-st in dcV-st, 2 (4, 4, 4, 4) tr in 2nd dc of dcV-st**, sk next dc, work 15 (15, 15, 17, 17) CRdtr; rep from * to **, work 8 (8, 8, 9, 9) CRdtr, tr in top of tch, turn—8 (8, 8, 9, 9) CRdtr each front, 12 CRdtr each shoulder, 15 (15, 15, 17, 17) CRdtr for back, 4 trV sts.
Size 32 1/4 only:
Row 2: Ch 4, sk first tr, work 8 CRdtr, *3-st CRdtr (see Stitch Guide), trV-st in trV-st, 3-st CRdtr, work 12 CRdtr, 3-st CRdtr, trV-st in trV-st, 3-st CRdtr**, work 15 CRdtr; rep from * to **, work 8 CRdtr, tr in tch, turn—8 CRdtr and one 3-st CRdtr each front, 12 CRdtr and two 3-st CRdtr each shoulder, 15 CRdtr and two 3-st CRdtr for back.
Sizes 34 1/2 (36 1/2, 40 1/4, 44)" only:
Row 2: Ch 4, sk first tr, work 9 (9, 10, 10) CRdtr, *trV-st in trV-st, 3-st CRdtr (see Stitch Guide), work 12 CRdtr, 3-st CRdtr, trV-st in trV-st**, work 17 (17, 19, 19) CRdtr; rep from * to **, work 9 (9,10,10) CRdtr, tr in tch, turn—9 (9, 10, 10) CRdtr each front, 12 CRdtr and two 3-st CRdtr each shoulder, 17 (17, 19, 19) CRdtr for back.
All sizes:
Divide for body and sleeves:
Note: For size 32 1/4", cont in 2nd tr of trV-st after skipping shoulder sts. With RS facing, ch 3, dc in first tr, [dc3tog over next 3 sts, 3 dc in next st] 9 (9, 9, 10, 10) times, ch 0 (4, 8, 8, 16) for underarm, sk shoulder sts and next trV-st, [dc3tog over next 3 sts, 3 dc in next st] 17 (17, 17, 19, 19) times, ch 0 (4, 8, 8, 16) for underarm, sk shoulder sts and next trV-st, [dc3tog over next 3 st, 3 dc in next st] 8 (8, 8, 9, 9) times, dc3tog over next 3 sts, sk last st, 2 dc in top of tch—34 1/2 (34 1/2, 34 1/2, 38 1/2, 38 1/2) Mini Ripples and 2 ch-0 (4, 8, 8, 16).
Sizes 34 1/2 (36 1/2, 40 1/4, 44)" only:
Set-up row: (WS) Ch 3, dc in first dc, work 8 (8, 9, 9) Mini Ripples to last 2 dc before underarm ch, *dc3tog over next (2 dc and ch), 3 dc in next ch, [dc3tog over next 3 ch, 3 dc in next ch] 0 (1, 1, 3) times, dc3tog over next (2 ch and dc), 3 dc in next dc**, work 16, (16, 18, 18) Mini Ripples to last 2 dc before underarm ch; rep from * to **, work 9 (9,10,10) Mini Ripples to end—37 (39, 43, 47) Mini Ripples.
All sizes:
Next row: Ch 3, dc in first dc, *dc3tog over next 3 sts**, 3 dc in next st; rep from * across ending last rep at **, 2 dc in top of tch, turn. Rep last row 17 (16, 16, 16, 16) times—19 rows Mini Ripples.
Next row: Ch 4, beg in first st, work CRdtr across, tr in top of tch, turn—35 (37, 39, 43, 47) CRdtr.
Next row: Ch 4, work CRdtr across, tr in top of tch, turn.
Next row: Ch 3, dc in next tr, *dc3tog over next 3 sts**, 3 dc in next st; rep from * across ending last rep at **, 2 dc in top of tch, turn.
Next row: Ch 3, dc in first st, *dc3tog over next 3 sts**, 3 dc in next st; rep from * across ending last rep at **, 2 dc in top of tch, turn. Rep last row 2 times-4 rows Mini Ripples. Fasten off.
FINISHING
Button bands:
Measure 6" down from front center top comer for button band and pm on both sides.
RIGHT BUTTON BAND:
With RS facing, join yarn at m on right front.
Row 1: Ch 1, work 25 sc evenly spaced up along front edge to neckline top corner, turn.
Row 2: Ch 1, sc in first sc, *ch 2, sk next 2 sc, sc in next 5 sc; rep from * 2 times, ch 2, sk next 2 sc, sc in last sc, turn—4 ch-2 buttonholes.
Row 3: Ch 1, sc in first sc, *2 sc in ch-2 sp, sc in next 5 sc; rep from * 2 times, 2 sc in ch-2 sp, sc in last sc. Fasten off.
LEFT BUTTON BAND:
With RS facing, join yarn to neckline top corner on left front.
Row 1: Ch 1, work 25 sc evenly spaced down to m, turn.
Rows 2-3: Ch 1, sc in each sc across. Fasten off. Sew 4 buttons evenly spaced on left button band opposite button holes, placing shank into 2nd row of sc.
Neckline edging:
Before adding edging to neckline, try on sweater. If neckline is a little large, work the edging with a smaller hook to tighten it up. With RS facing, join yarn at right top corner of button band. Ch 1, work 1 rnd of sc evenly around neckline, ending at opposite corner on left button band. Fasten off. Weave in ends.


.png)
.png)


.png)
.png)
.png)


.png)


